Using your OneLife iD identity
Help Section
Carrying a personal ID with ICE (in case of emergency) information ensures immediate identification, effective and prompt treatment, quick communication with your emergency contacts and provides ‘peace of mind’.
Interactive Online Profile
OneLife iD has a range of products to suit everyone. Choose your iD and then select your personalised ICE engraving or printing.
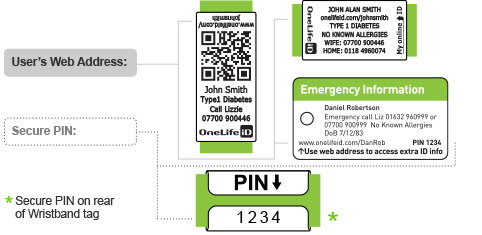
Each OneLife iD also has a weblink and sometimes a QR code, which connects directly to your OneLife iD online profile where you can include additional, more detailed information.
To access your details, emergency responders can read your engraved or printed details or just type the web link on the iD eg www.onelifeid.com/danrob into a web browser or where appropriate scan the QR code. Many emergency and medical services now automatically look for ICE IDs and are familiar with accessing details online.
All your important information in one place
As you complete your OneLife iD online profile our step by step guide ensures you have everything covered plus we provide some helpful ideas about ways in which our iD is being used.
With OneLife iD you are in control of the details you enter on your ID online profile and your information can easily be updated if contact numbers change or medical ID information needs refreshing. Your profile can store personal details, emergency contacts, detail about medical conditions, allergies and medication, photo identification plus numerous ‘useful’ documents, images and web pages such as medical instructions, insurance or travel documentation. Watch our Instructional Videos or visit our demo profile and enter the PIN 1234 in the emergency section to see how it all works.
OneLife iD – a multifunctional iD
Multiple iD products can be linked to a single OneLife iD profile. This means you can use our stickers, tags and key rings to mark valuables, equipment, pets or even the kids.
The OneLife iD range of sports, emergency and medical ID products, together with the online profile, provide an adaptable ID system for all:
- lifestyles (active people, commuter, kids and seniors)
- activities (sports, commuting, travel or play)
- functions (emergency, medical, social or lost and found)
OneLife provides a flexible iD no matter; Who you are, What you do or Why you need an ID.
Watch our instructional videos www.onelifeid.com/page/ID-wristbands-videos for further information.
Top Tips Information to include on emergency or medical ID bands
We can all appreciate the benefits of leading an active lifestyle whether it is walking the dog, riding or even adventure sports.
Before venturing out it makes sense to prepare well and ensure you have the right kit. At OneLife iD we believe this includes carrying or wearing an up to date form of identification which will quickly provide vital information to emergency services so they can deliver the care you need.
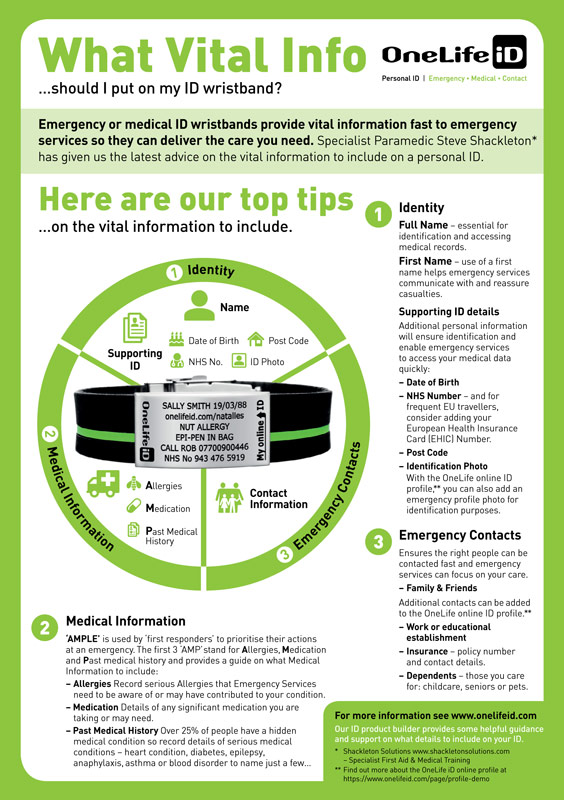
At OneLife iD we are often asked, “What vital information should be included on my emergency or medical ID wristband or tag? We asked Specialist Paramedic Steve Shackleton for the latest advice on what vital information to include on a emergency ID wristband or Medical ID bracelet. He focussed on 3 main areas:
- Identity
- Medical information
- Emergency contacts
The following guidelines highlight the range of information emergency services need and will enable you to select the details you need to record on your ID.
Download our Quick Guide here.
1 - Identity
Name - Your Full Name is essential for identification and accessing medical records.
Emergency services use a first name to communicate and reassure casualties. Hearing tends to be the last sense that people lose when consciousness is impaired so using a first name really helps getting a casualty to respond.
On a Child’s ID you may wish to assess the pros and cons of providing their name.
Additional personal information:
Date of Birth, NHS Number or Post Code can all be used by modern electronic care systems to enable emergency services to access your medical data quickly. For frequent EU travellers consider adding your European Health Insurance Card (EHIC) number.
Identification Photo - The OneLife online ID profile allows you to add an up to date photo. This is one of the best mechanisms for confirming correct identification and helps ensure that accurate information is communicated to the right people. For more information on the OneLife iD online profile click here.
2 - Medical Information
‘AMPLE’ is used by ‘first responders’ at the scene of an incident to prioritise their actions. The first three letters ‘AMP’ for Allergies, Medication and Past medical history. The AMP details help emergency services assess whether your Allergies, Medication or Past Medical History may be a contributing factor in your condition and enable emergency services to provide prompt and effective treatment.
Allergies - Paramedics want to be aware of any allergies you may have that may be the reason for the ‘presenting condition’ or to ensure that whatever support they provide does not make you worse.
Medication - Details of any significant medication you are taking or may need.>
Past Medical History – Over 25% of people have a hidden medical condition that may not be immediately obvious such as dementia, heart condition, diabetes, anaphylaxis, epilepsy, asthma, severe allergy or blood disorder to name just a few.
Details of your medical history are critical in enabling the provision of correct treatment. An ID should highlight relevant medical history to ensure prompt and effective care.
If you know your blood group you can include it but it is not necessary as this is included in your medical record or is routinely checked before treatment is given.
3 – Contact information for emergency contacts
Contact Information helps support quick communication with your emergency contacts and enables emergency services or those with you to focus on your care.
As well as close family and friends you may also use the online profile to add extra emergency contact information:
· Dependants – details and arrangements for those you care for including children, seniors or pets.
· Insurance – For frequent overseas travellers insurance details including policy number and contacts may be useful.
OneLife Online ID profile
With the OneLife online ID profile you can provide additional emergency contacts and more detailed information and attachments. Whenever you update your emergency contact numbers or medical information the ‘Last Reviewed Date’ is automatically updated. For more information on the OneLife iD online profile go here.
Summary
When it comes to personal identification everyone has different needs but we hope that the guidance is useful in helping you to understand what emergency services need:
- Identity
- Medical information – allergies, medication and past medical history
- Emergency contacts
So with this guidance you can assess what information you need to include on your ID and which of our ID products (ID wristband, sports ID, medical alert bracelet, ID card, ID tag) best suits your needs.
Find more information, support and to view our product range - click here.
Specialist Paramedic Steve Shackleton runs Shackleton Solutions – provider of Specialist First Aid & Medical Training
This section is an Overview of OneLife iD - for details on creating and updating your personal OneLife iD Account and Profile, see that section below.
Welcome to OneLife iD, the new, fully interactive ID band that:
- Functions as a personal ID during sport, socialising or at work
- Protects you and your stuff during travel, exercise or out and about
- Displays updateable emergency, medical, social and contact information
- Provides a 'one-stop' personal ID webpage that can be used in social media
With OneLife iD you will benefit from the following:
- Updateable online pages mean your ID profile content and design can be updated whenever required - even change for different events, functions, moods.
- Capacity holds almost as much as you want - detailed medial information, multiple emergency contacts, documents (travel insurance), photos, website links.
- Multi-function the ID provides emergency contacts, important medical information plus social and lost and found uses. You can also use your personalised URL in other situations for example in your e-mail signature block, on business cards or luggage tags.
- Daily use unlike a traditional Emergency ID that is hopefully never used, your OneLife iD can be put to use regularly providing connections for friends, family & children, identifying pets and valuables as well as providing ID for business, networking, travel and social occasions.
- Choice you can opt to store all your information online or, if you need additional re-assurance, OneLife iD provide ICE engraving on the product itself to support the online ID profiles.
To get started we suggest you follow these 3 simple steps:
- Educate yourself on how to make the most of QR codes and QR readers
- Populate your 'My Account' personal OneLife iD webpages
- Communicate learn how to share you details with friends, colleagues and emergency responders
You will find information on Adding Information to your online ID profile How OneLife iD Works and View Demo Profile. As a Quick-Start why not click here to read our Getting Started Guide (PDF document).
Watch our instructional videos www.onelifeid.com/page/ID-wristbands-videos for further information.
Activating your OneLife iD product
With your product you will receive a Product ID and an Activation Code. This is included on the instruction card with the Product and/or your despatch e-mail (note the e-mail normally includes a direct link to your activation page).
Once you have these go to www.onelifeid.com/activateorder and follow the instructions.
- Enter the Product ID and Activation Code and click on Activate
- For New Users you will need to create an account by selecting an Account Name (it needs to be an e-mail address) and password.
- For existing users you can attach the new Product ID to your existing Account
Now you are ready to 'Create and Update' your Personal OneLife iD 'My Account'.
View our How OneLife iD Works video for a quick overview
Overview - Populating your OneLife iD 'My Account'
Creating and customising your OneLife iD 'My Account' profile is easy. Start by logging into the OneLife iD website and activating your account (see above).
Once you have activated your 'My Account' you can re-visit the 'Admin' section of your Account at any time to update or add further information (see next section). Click here to watch our instructional Video on Adding information with the OneLife online iD profile.
First login to the OneLife iD system using the 'Sign In' button at the top right hand corner of the 'Home Page' You can then add as much or as little information as you want to. You can also update your profile at anytime, as many times as you need to. Click here to watch our instructional Video on Adding information with the OneLife online iD profile
Simply work your way down the various sections of the 'My Account' profile editor, adding your personal information, creating links to your online social media sites, adding photos, emergency contacts, relevant medical information and business information.
At any point review what people can see by clicking 'Public' in the top right hand corner. To return to editing your profile select Admin. Remember, whilst you are 'Signed In' you can view your emergency details without entering your PIN. However, others can only see your Emergency section when they have access to, and enter, your PIN (engraved on the ID tag).
If you just want to use your page for emergency and medical information that is fine. For anyone with a registration to an existing medical site such as the "Organ Donor Register" or "MedicAlert®", that connection can be added too.
Or take visitors directly to your Facebook or Twitter page by using the redirection feature.
Entering Details to the OneLife iD My 'Account' Sections
This section provides help on what to fill-in and why it could be useful? Each section also includes additional help and guidance. The progress bars on the 'My Account' page and above important sections highlight how complete your information is.
This area is called My Account. It comprises 7 expanding 'Accordian' sections some of which include additional tabs. There's no need to complete all sections - just the ones you want on your OneLife iD mobile webpage.
- Personal Information - your basic details plus 'mood' wallpapers to customise the look of your personal ID webpage.
- Social Profile - your social media links such as Facebook or Twitter plus any other favourite websites. Also includes an 'About Me' tab where you can provide more information about your life and what you do at work and play.
- Emergency Page
- ICE (In Case of Emergency) contacts. Up to 3 contacts with 2 contact numbers per person. Provides auto dial facility. Also details of GP and NHS number.
- emergency medical details such as medical conditions, allergies or important medication - even upload important images or documents such as medical documents or insurance policy details.
- Auto 'last reviewed' date time stamp
- Lost Property - contact details to enable people to return your stuff if they find it, could be used for your phone, laptop even your pets. Going away on holiday or a day trip why not get the kids to wear a OneLife iD with your contact details on?
- Photos - add photos to be used as the profile images plus other favourite photos.
- Redirection - if you don't need a profile here but want to link your QR code to another site (eg Facebook page) then switch the redirection facility on or off at any time.
Now you are ready to share your interactive OneLife iD personal webpage. For further information go to our helpful View Demo Profile page.
Ordering replacement Tags or ID products for an existing OneLife iD account
If the emergency information on your ID tag or card changes or you misplace your ID then you should get your ID product replaced. The OneLife iD system enables you to order replacement tags or ID products that link to your existing online ID profile. So whilst you need to input the details you need engraved on your ID, there is no need to create a new online ID profile.
Because your OneLife web address eg www.onelifeid.com/danrob is unique to you, the OneLife system allows only you to order products with that unique address: So here is what you need to do to order a replacement tag or complete ID product.
Step 1 – Sign-InIn the top right hand corner of the home page (www.onelifeid.com) in the grey header select “User Sign In”. Note your username will be an email address format and you will have selected your own password. If you have forgotten your password, you can enter your username and request a new password. Additional guidance below in Sign-in Quick Guide and Sign-in FAQs.
Step – 2 Navigate to the OneLife iD ShopOnce signed-in to your Profile Admin page, select Shop from the black menu bar towards the top of the page.
Step 3 – Re-order your ID product with the new detailsFrom the shop navigate to the product of your choice and then specify the emergency contacts or medical information you need engraved or printed on your tag or card. As you are signed in, you will be able to specify your existing web address so that your replacement tag or ID product will link to your existing OneLife iD online ID profile.
Step 4 – CheckoutComplete your details in checkout.
For additional help see the Sign-in quick guide below
Sign-in Quick GuideMake sure you have activated your ID and set up your OneLife online ID profile.
- username and password are how you manage the information on your OneLife online ID profile.
- web address and PIN are how other people view your information on your OneLife online profile.
When did I set-up (create) my ‘new user account ‘ and OneLife online ID profile?
Your ‘new user account’ is normally set up on receipt of the “Order Despatch” email (from orders@onelifeid.com) or “Order Despatch Note” that came with your product. All you have to do is follow the activation instructions within the email or despatch note.
Successful completion of user account set-up will have been confirmed to you in the “Added New User” email received from orders@onelifeid.com.
How do I check if I have set up my ‘new user account ‘ and OneLife online ID profile?Enter the web address on your ID into a browser (eg Chrome, Safari, Firefox etc) to view your OneLife online ID profile. If it shows ‘Page not found’ then you will need to follow the activation instructions within “Order Despatch” email (from orders@onelifeid.com) or “Order Despatch Note” that came with your product.
What is my username and password? eg your e-mail address and password sD496gyYour username and password are how you securely manage the information on your OneLife online ID profile. You will have specified the user name and password when you first/originally created your ‘new user account’ for your OneLife online ID profile. Successful completion of user account set-up will have been confirmed to you in the “Added New User” email received from orders@onelifeid.com.
What are the web address and PIN on my ID? eg www.onelifeid.com/JohnSmith and PIN 7485The web address is the information someone would use (enter into a browser) to view the public information on your OneLife online ID profile. With the web address and PIN people can access your information in the emergency section of your OneLife online ID profile. The web address and PIN are not the username and password.
Active iD, Black Ops iD, Black Ops iD, Medi Lumo iD, Medi iD, Squadra iD, Stealth Squadra iD
Adjustable soft silicon band with stainless steel or black watch-type clasp.
These iD products are adjustable to any size.
However they are not advisable for very young children.
Adventure iD
One size available in our one-piece 19mm wide soft silicon wrist band.
Medium - 190mm to fit wrist 155mm - 190mm
Each silicon wrist band can be stretched to fit over the hand.
For further information on correctly sizing your silicon wrist band see our and video and additional information at www.onelifeid.com/help
Freestyle iD
3 sizes available in our one-piece 12mm wide soft silicon wrist band.Small (160mm diameter) - suitable for wrist sizes 125mm - 160mm
Medium (180mm diameter) - suitable for wrist sizes 155mm - 180mm
Large (200mm diameter) - suitable for wrist sizes 175mm - 200mm
Each silicon wrist band can be stretched to fit over the hand.
Note: Bands may stretch slightly (1 – 3mm) with use.
For further information on correctly sizing your silicon wrist band see our and video and additional information at www.onelifeid.com/help.
Classic iD (Fabric band with velcro closure)
Small - wrist size minimum 125mm to 150 mm.
- note small Classic iD is for children or grown-ups with very small wrists.
Medium/Large - wrist size 150mm to 200mm.
(Total band length including fold over fastening 265mm)
https://www.onelifeid.com/page/Cutting-ID-Wristband-video
https://www.onelifeid.com/page/ID-Wristband-clasp-video
Watch our instructional videos www.onelifeid.com/page/ID-wristbands-videos for further information.
Do you take your Smartphone with you everywhere you go? Then load up OneLife iD’s In Case of Emergency (ICE) Smartphone lock screen or wallpaper and have your ICE details readily available. Click here to watch our instructional video on how to add emergency contacts or medical details to your mobile phone with the OneLife iD ICE screen.
The Mobile ICE Screen is a simple 'photo' or screenshot image of your OneLife iD personal ID web pages that you save as your SmartPhone screensaver or wallpaper.
Using the information on your online profile My ICE Screen enables you to custom build an In Case of Emergency (ICE) locked screen or screen saver for your mobile phone.
Find out more about the OneLife ID In case of Emergency (ICE) screen with our short video. (Click to View)
Setting Up your Mobile ICE Screen Content
Within My Profile go to My ICE Screen and follow these 5 steps:
- Select & adjust the information to fit your mobile screen
- Choose a background colour & design
- Adjust content to fit your mobile screen by hiding unnecessary details and editing your information.
- Click on Create ICE screen to view your ICE screen web page. Go back to repeat 3 as required.
- When it is right take a screenshot (refer to your device help for info) and save as screen saver or locked screen.
The OneLife iD Mobile ICE Screen is a great way to conveniently carry supplementary ICE information plus you can update it whenever your information changes.
Watch our instructional videos www.onelifeid.com/page/ID-wristbands-videos for further information.
Sharing OneLife iD - now you are ready to share your interactive OneLife iD personal webpage. Friends, contacts and emergency responders can use free QR code reader apps to read your information.
- Sharing share your details, or the details of someone you have met and scanned, with others using the 'share' functions available on many of the QR scanners and readers. 'Share' facilities are normally available for e-mail, SMS, Twitter and Facebook. Some even offer Geo-spatial data
- E-mail add your unique onelifeid.com url eg www.onelifeid.com/danrob to your e-mail signature block. Means the reader can easily access your updated details
- Social Media Tweet or share on Facebook the details of people you have just met
- Social Media Use the URL as your personal website on Social Media sites eg Linked-In, Twitter, Facebook etc
Take a look at View Demo Profile page to see how you might build your own profile page
At OneLife iD we are committed to protecting your privacy and security of your information. Our Privacy Policy sets out how we use and protect the information you provide us.
OneLife iD recognises and appreciates the importance of responsible use of information collected through the OneLife iD website. We will use information in accordance with the Data Protection Act 1998 and any other laws or regulations currently in force in the United Kingdom (the "Data Protection Legislation").
We are registered at OIC (Office of Information Commissioner) as a data controller under the Data Protection Act 1998.
OneLife iD does not keep a record of credit/debit card details. These are handled by our Merchant Services Provider.
To view our Privacy Policy click here
We hope you find this section useful in helping you get the best from the QR Code readers.
With QR Code scanning there are 3 variables:
- The QR Code scanning application (or app)
- The device or SmartPhone you are using
- How you use it - which is covered in the next section
QR Code Scanning Apps
There are a wide range of QR scanners available for smartphones including: iPhone, Android and Blackberry.
Just visit the app services page for your phone and search for "QR code", "QR readers" or "QR scanners". Most of the apps are free to download and use.
Most QR code scanning applications will keep a history of the codes they have scanned, allowing anyone who has scanned your code to revisit your page later or to store your profile page in their contacts. Some applications allow you to post your new contacts directly to Facebook or Twitter or email.
The QR scanners are all different. Most QR scanners have the following capabilities:
- Scanning some scanners are better than others at scanning the OneLife ID tags. Some are good in variable light conditions with others offering 'light' to allow scanning in the dark
- Scan history and favourites most scanners record your scan history but some are better than others at letting you view who you scanned and how your organise your favourites
- Social media integration for those 'social-networks' some QR scanners offer a range of ways of interacting with social media including the ability to share details of those you have scanned on Faceboook, Twitter and more
In our view, the priority is choosing an App that scans your QR code well. Don't just settle for the first one you download. Some just don't work very well or were designed for a different purpose eg Barcodes. Try a few out in different light conditions, consider selecting one with a light for night scanning. Once you have settled on 2 - 4 that work for you then consider what other functions are most important for you and which App that scans well meets your needs.
Here at OneLife iD we have tested many of the most popular apps and the following work well: Redlaser, TapMedia, Scanlife, QR Droid, Optiscan, QR Barcode Scanner, or the ZXing scanner.
To help you out we have included summaries of a few of the QR Code Scanners that we have reviewed (see QR Code Scanner Reviews below)
Device or SmartPhone
The scanning or reading of OneLife iD QR codes is supported across most current smartphones. We have found that it is necessarily the most expensive SmartPhone that works best. Some SmartPhone and App combinations are slow to scan because, whilst the camera quality is excellent, it is constantly re-focussing which impacts scan performance.
Firstly select a scanner that works on your phone, just because an App works for a friend, it may not work as well on yours if it is a different type of SmartPhone.
All of the SmartPhones will work but it takes a little research and experimentation to establish which combination is best for you.
QR Code Scanner Reviews
As some QR readers work better on certain SmartPhone types we have grouped our reviews under the following:
- Android
- iPhone
- Blackberry
We have tested these products purely from OneLife iD's perspective ie scanning the QR code on the ID tag. For an independent view try the following link to a set of reviews by Chris Edwards on the 708 Media web site
Another source of QR Scanner reviews is here.
Efficient scanning of QR codes relies on the scanning application seeing the QR code clearly and detecting the contrast between the dark and light parts of the code. Codes will scan more quickly in good light and where glare or reflections are minimised.
We have done hours of testing various applications in different light conditions and using ID plates with different laser engraving approaches and sizes.
We have settled on the current contrast and size as it works in the majority of situations. We have our favourite apps and 9/10 allow the phones to scan immediately.
Here are our tips to how you can get your SmartPhone to scan quickly and easily:
Select the best App for you and your phone - don't settle on the first - download a few and test them out
Practise scanning - we have found the following:
- Hold the plate and SmartPhone still
- Troubleshooting - if it doesn't work after a couple of attempts:
- Try tilting the plate slightly
- Move the phone away and then let it re-focus
- Vary the distance between phone and plate to find the optimal distance
- Try turning the QR code round 90 degress - (some apps may not use the orientation indicators within the QR code)
- Light Conditions
- The best conditions are good daylight but you can scan in most conditions with a good App (with light) and technique)
- Avoid glare - from bright lights eg flickering fluorescent lights create difficult conditions for scanning
- Avoid dingy light conditions - it is best to use the light (available on many Apps) to scan